The sissy squat is an excellent warm up and even better finishing exercise which has been used by people since the 1960’s. Since it focuses entirely on the quads, leaving out all the other muscles during the movement, it is considered to be a great exercise to work your thigh area. Sissy training enhances core strength, develops balance and builds quads. The beginners are recommended to use only their body weights in this exercise while professional athletes can add weight to benefit more.
Instructions for Basic Sissy Squat
Step 1
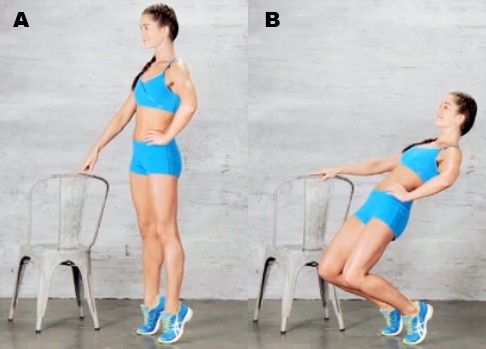 With your toes pointing out slightly, adopt a shoulder width stance. Take hold of a chair (or any equipment within your reach) with one or both hands for balance.
Step 2
Bend your knees by pushing them forward and down in a backward descent, keeping the back and core tight and the waist and hips straight. The heels will come off as the knees come down.
Step 3
Bend the knees until they are almost touching the floor. At this point, your lower legs will be nearly parallel to the floor. While maintaining your balance, let your body fall back as much as it can.
Step 4
Return to the original position in a controlled fashion after pausing for a second. Push the floor to straighten your legs and return the heels to the ground.
Step 5
Breathe between the reps but exhale only after completing the reps. Repeat until you reach the desired reps.
Watch a video of how to perform the basic sissy squat:
Instructions for Weighted Sissy Squat
 A variation of the sissy squat is the weighted sissy squat. They are performed while holding a dumbbell to the chest. It is important to practice the sissy squatwithout weights first to get comfortable with the movements before moving on to this advanced form of the exercise.
Step 1
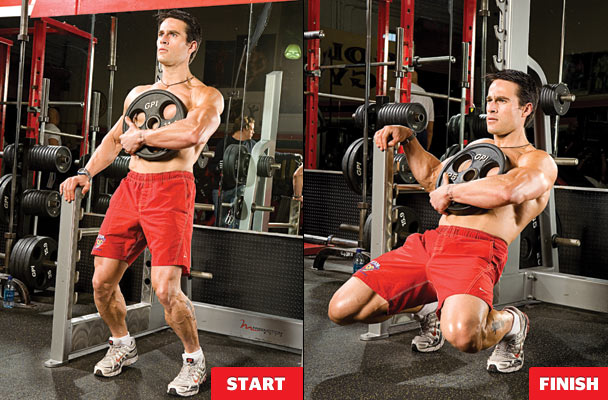
Stand upright with toes raised and feet shoulder width apart. Hold the beams of a squat rack with one hand and a weight plate on top of the chest with the opposite arm.
Step 2
Lower your body to the floor by bending the knees and bringing the pelvis forward. Take a breath while going down and stop when the lower and upper legs are at right angle to each other. Maintain this position for one second.
Step 3
Use the thigh muscles to bring the torso back up to the starting position after holding for one second. Exhale when moving up.
Step 4
Repeat for the desired number of times.
Here is a demonstration of the weighted sissy squat:
Instructions for Gironda Sissy Squat
 Vince Gironda, the mentor of Mr. Olympia Larry Scott, introduced the Gironda Sissy Squat which is also known as the three-way sissy squat. It is a variation which does not strain the knee joint when performed correctly. It is more effective too as it increases the load while dividing the movement into two parts.
Step 1: Knee Drop
Clench the bar close to the collarbone and neck, stand in an erect position with the head, shoulder, back and spine in line, knees fully extended, abs tight and heels on the board. Now keeping the body in a straight line from knee to head, bend your knees forward while keeping the load balanced over your feet.
Step 2: Burlesque Bump
Ensuring your balance, try to descend as low as you can, keeping the weight over the feet. Now perform the burlesque bump by driving the hips forward, keeping the back to the lowest part of the knee drop. Picture this movement as a hip thrust and perform it faster than the previous movement.
Step 3: Flush Out
This step is a mix of both step 1 and 2 in which the burlesque bump and extension of the back to a straight position is performed immediately after the knee drop.
Watch a demonstration of Gironda Sissy Squat:
Tips for Sissy Squat
- Lean back at the beginning of the exercise to form a straight line from the neck to the knees. Effective isolation of the quads can be made by maintaining this line during the exercise.
- Use a 2-4 inches step for positioning your heels while keeping your toes on the floor.
- If you push the knees forward too much, you will transfer extra weight on it, resulting in kneecap pain while descending. Regular stretching of quads can help in curbing the pain too.
- Keep nothing behind you so that if you fall nothing can hit you on your way down.